

Many years ago, I shared a technique I developed for making polymer clay brooches utilizing postage stamps in Stampington Publications' Belle Armoire Jewelry II. I did not specifically address how to design the back of the brooches at that time and would like to do so today. Brooches have never totally gone out of style, but they seem to be re-emerging as decorative pieces for accessories such as scarves and handbags.

That being said - onto the tutorial!
Tools/supplies:
Pre-baked polymer clay brooch
Pasta machine dedicated for clay use (optional)
Rolling pin dedicated for clay use
Texture sheet
Mini cookie cutter
Pin back finding
Polymer clay - 1/4 of a block
Translucent Liquid Sculpey (TLS)
Instructions:
Prepare polymer clay for use by kneading it between your fingers until it is workable. Insert it through a pasta machine at the thickest setting; fold it in half upon removal from machine. (If you don't have a pasta machine, roll out the clay with a rolling pin to approximately a 1/8" thickness. Omit folding the clay in half.)

Place the clay on top of a texture sheet that has been spritzed with water or lightly dusted with baby powder to prevent the clay from sticking. Use the rolling pin to press the clay into the texture sheet, pressing firmly.

Gently remove the clay from the texture sheet. It should look something like this:

Lay the clay with embossed side laying face up on a protected work surface. Make sure the cookie cutter is large enough to just cover the center of the pin backing without interfering with the pin mechanism.
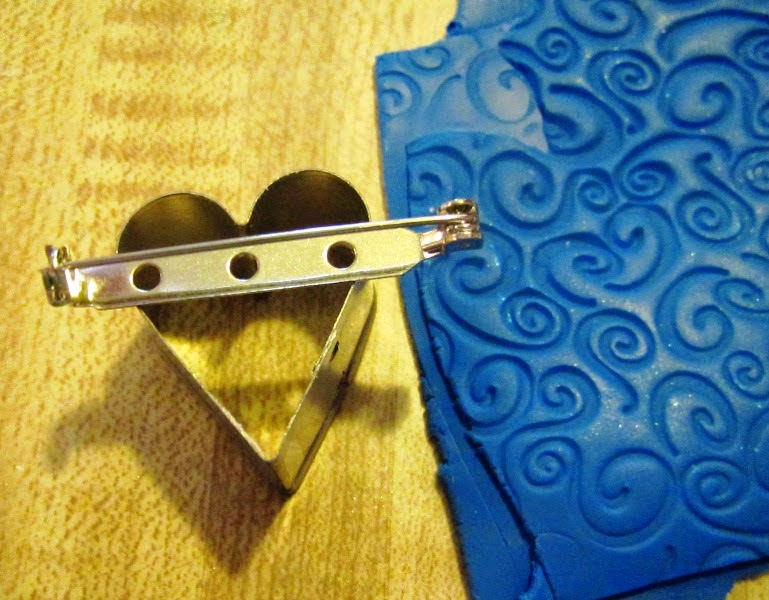
Place the cookie cutter on top of the clay, and press it down firmly, just like you are using it to make real cookies.

Carefully remove the clay from the cookie cutter.

Place the pre-baked brooch face down on the work surface. Squeeze the TLS down the center length of the pin back finding.

Place the pin back finding on the back of the brooch, the TLS side facing down. The pin may want to slide around, so work carefully.

Pick up the piece of clay that was cut with the cookie cutter. Apply a squeeze of TLS on the wrong side of the clay...

...and set it down on top of the pin backing. Press gently into place.

Put the brooch in a pre-heated oven and bake according to the manufacturer's instructions as directed based on the thickness of your piece.
OPTIONAL: If desired, prior to baking in the oven, brush some Pearl-Ex powder onto the pin back for extra effect, as I did in the brooch used in the example.
And there you have it - a functional and decorative pin backing for your handmade brooch.
If there are any specific techniques you would like for me to share with you, please feel free to leave me a comment for me here on this blog, or email me at craftymule@yahoo.com.
No comments:
Post a Comment